
Agarose gel simulation lets you find the location of restriction enzymes on a gel and perform ‘mock’ digests to determine the expected size of digest products on an electrophoresis gel. Gel simulations let you find the ideal percent agarose and set of molecular weight markers to resolve your DNA fragments. This digital simulation replaces manual plotting of DNA fragment mobility on graph paper. Once you run the actual gel in your laboratory, you can place the gel or its image side-by-side with an image of the simulation to confirm gels that have complex banding patterns.
The following video is a brief walkthrough of the agarose gel simulation workflow:
To perform an agarose gel simulation:
- (optional) Open the sequence you wish to use in the simulation.
- (optional) If you plan to apply primer pairs to one or more lanes of the simulated gel, locate the primer pairs.
- Use the shared button tool Open Agarose Gel (
![]() ) or choose File > New Agarose Gel.
) or choose File > New Agarose Gel.
 ) or choose File > New Agarose Gel.
A new project window opens with the Gel Simulation and Fragment Sizes views active. On the right, the Sequences, Enzymes and Primers panels appear at the top, and the Settings and Markers panels appear on the bottom. All of these views and panels are synchronized, meaning that each of them will update simultaneously when a change is made in any of the other views or panels. If a file was already open in SeqBuilder Pro, it will be added to the Sequences panel.
- Click on the Settings tab and define gel parameters such as dimensions, percent agarose, and run time. Choose from a variety of commercial gels, and/or enter custom parameters.
- Select the lanes one by one and apply a molecular weight marker, sequence, enzyme, or primer pair.
- To apply a molecular weight marker, select a gel lane. Then click on the Markers tab and check the box next to the desired marker. For more information, see Markers panel.
- To apply a sequence, select a gel lane. Then click on the Sequences tab and check the box next to the sequence of interest. To add sequences to the panel, right-click within the panel and choose Import. For details, see Sequences panel.
- To apply an enzyme, select an already-populated gel lane. (Note: If a lane is unpopulated, follow the bullet point above to first apply a sequence to the lane). Then click on the Enzyme tab and check the box next to the enzyme of interest. For more information, see Enzymes panel for gels and Apply or remove enzymes in the gel simulation view.
- To apply a primer, select a gel lane. Then click on the Primers tab and check the box next to the desired primer pair. For details, see Primers panel.
- To apply a molecular weight marker, select a gel lane. Then click on the Markers tab and check the box next to the desired marker. For more information, see Markers panel.
To analyze the results:
- To select a fragment and its range on the sequence, click on a band in the Gel Simulation view, or on a fragment size notation in the Fragment Sizes view. The fragment is shown in red, and the footer is populated with information about the selection. Any fragment from the same sequence as the selected fragment, and which overlaps the selected fragment in any way, will appear in blue.
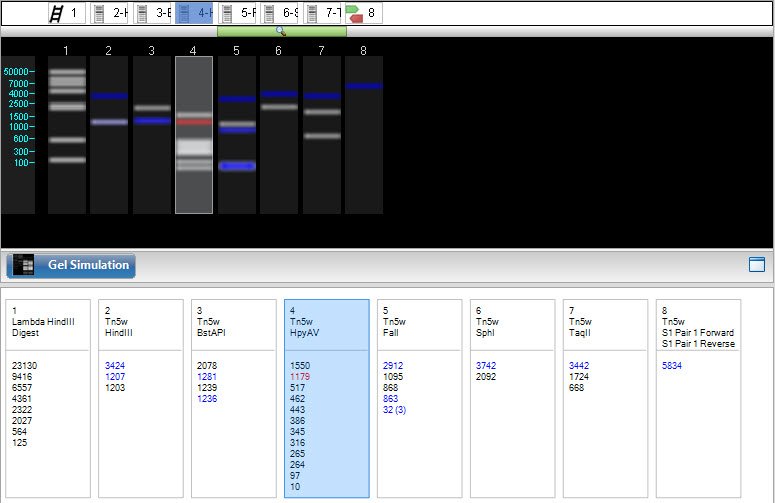
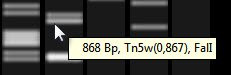
- To view information about a band or fragment size notation, hover the mouse over it to reveal a tooltip.
Need more help with this?
Contact DNASTAR